No products in the cart.


This article was written by the New York Institute of Photography, America’s oldest and largest photography school. NYI provides professional-level training via home study for photographers who want to give their images a professional look, and perhaps earn extra income with their camera.
Better Pictures – Automatically!
Editor’s Note: Since 1985, automatic camera features have multiplied rapidly. Film point-and-shoot models offered the convenience of auto focus and auto exposure, and the digital models introduced in recent years offer a dazzling array of features. The problem is that it’s still far too easy to take poor pictures – automatically.
To assist our readers, we turned to the New York Institute of Photography, America’s oldest and largest photography school, and they have agreed to provide short articles for each issue of the ritzcamera.com newsletter to help our readers take better pictures – automatically! No, we don’t plan to implant servomotors or the latest circuit board to automate you. Instead, we’re going to help you learn techniques so simple that you’ll remember to use them every time you pick up a camera to take better pictures.
SHARP PICTURES - Part Two:
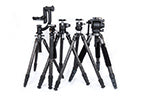
Steadying Your Camera – Get a Tripod!
As we covered in Part One of this series on SHARP PICTURES, camera shake is the reason you get a picture that is soft everywhere. In Our First Installment in this series, we reviewed how important it is to hold your camera steady in your hands, and how to accomplish that.
 |
|---|
 |
 |
 |
But holding your camera steady only goes so far. It’s possible to do that without assistance when you’re shooting at 1/60th of a second, perhaps even 1/30th, but if you need to use a slower shutter speed, say 1/15th or 1/8th of a second or slower, you’ll need to find a way to steady your camera on an external support. You simply can’t rely on your hands to provide a steady picture at such slow shutter speeds.
For really slow shutter speeds, the solution is to steady your camera, either resting it on a solid surface, or using a tool such as a tripod or a monopod.
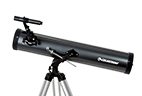
Every serious photographer should own a tripod, because there are times when you’ll have to use one to capture the picture that you have in your imagination. So the question isn’t whether you need a tripod, but what kind of tripod you need.
Years ago, the advice given to most students of photography was to buy the sturdiest, heaviest tripod you could afford. While on the surface that is good advice, the truth of the matter is that a sturdy, heavy tripod all too often gets left home. So that means, when you need it, you don’t have it. The corollary is that if you don’t have your tripod when you need it, then you don’t really have a tripod.
At the New York Institute we’ve modified our advice: The best tripod for you to buy is the one that’s light enough that you’ll carry it either all the time, or most of the time. That way, when you come upon a picture that requires a tripod, you’ll have one.
In recent times, there have been two significant developments that support this switch in tripod strategy.
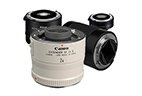
First, a variety of manufacturers make all kinds of interesting tripods. There are big, tall, expensive ones that are very light weight. There are teeny, tiny inexpensive ones that are cleverly designed to steady a camera atop a table or other flat surface that a photographer could carry in a pocket, and probably even take on an airplane.
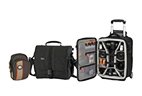
SECURITY TIME OUT: It is not possible to carry a large tripod (or, looking slightly ahead, a hefty monopod) onto an airplane. At NYI, we’ve raised this question in recent times, and as the Transportation Security Administration (TSA) ponders revising its policies, we may see clearer guidelines on tripods and monopods emerge.
At this time, we suggest that you pack any tripod or monopod in your checked baggage. Last time we looked, TSA regulations banned pool cues and hockey sticks from the list of acceptable carry-on items. As any photographer will tell you, if you want to cause damage or defend yourself, you’re a lot better off with a metal tripod than a pool cue or wooden hockey stick. The one exception would probably be a mini or ultra-mini tripod. That you can probably carry in your bag.
The second key development is that today there are a lot of light-weight cameras, including film SLRs, digital SLRs and digital point-and-shoot models. A lighter camera means you can use a lighter, flimsier tripod and still get rock-steady results most of the time.
A small tripod can be used on the ground or on a tabletop. Full-size models (and even giant tripods) often come with retractable spikes on their feet that can be used to hold the tripod and camera steady on ice or other difficult terrain.
There are really two secrets to getting good results with a tripod.
One important fact to realize is that the tripod is the steadiest when the center column isn’t extended. Therefore, if you want to work with your tripod at eye level, you’ll be best off with a tripod that can extend its legs to somewhere between five and six feet.
The second thing to remember is that you have to take the time to tighten all the parts of the tripod. Make sure the legs are secure, and the moving portions at the top of the tripod are all tight after you’ve composed your photograph.
With a little practice, you’ll find that a tripod can help you take pictures you couldn’t otherwise capture, and allow you to have great adventures using long shutter speeds.
Shop at RITZ with confidence

Customers Loves RITZ
Outstanding ratings across
review sites.


Secure Shopping
Shop with confidence knowing that your data and information is safe. We absolutely do not share nor sell your information with anyone.

Multi Payment Option
Easily complete your purchase with the payment method that is the best for you.


Secure Shopping
NEWSLETTER SIGNUP
New Products. Promotions. photo Tips. special offers
