No products in the cart.


Photographing Winter Sports
 Outdoor sports like downhill skiing, cross-country skiing, figure skating, speed skating, and indoor sports like hockey and ice skating. These are all activities you may be able to see – and photograph – in your home vicinity. They're sports in which men and women of all ages participate.
 In fact, one of the joys (and frustrations for us old-timers) on a slope is to watch a wolf pack of fearless four-year-olds schuss by and spray snow in our faces.
You'll probably find ice-hockey leagues in your area too – leagues in which sleepy-eyed suburban parents are known to get up at 4 a.m. to chauffeur their "Mosquito Division" kids to practice in the local rink. So you have lots of opportunities to photograph winter-type sports without going far from home.
 What about the bobsledding? We doubt that you see much of it around your home town. So we don't cover it in this article. The same with luge. In fact, we've come to the conclusion that the luge is probably the silliest sport ever devised: Grown men and now women going 90 mph feet-first on a sled. Come on!
 One tidbit about the luge, however, that raises it somewhat in our estimation: In 1905, when Einstein postulated his Special Theory of Relativity in which he performed a "mind experiment" imagining what would happen if he could ride on a beam of light (that is, travel at a speed of nearly 670 million mph) the fastest speed attained by man on earth up to that time was a little over 90 mph, and it was on a luge!
In any event, let's concentrate on how to photograph the winter sports you're more likely to find in your home area.
The first question with most winter sports is this: How should you handle your camera to minimize the effect of freezing cold on its operation?
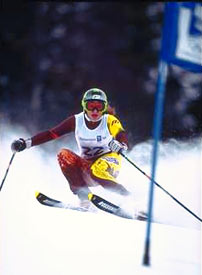
 So too with downhill skiing and cross-country skiing. In cross-country skiing, don't overlook the opportunity for a picture of the mob start, like this picture.
 There's one area in that article that is so important when you're photographing any winter sport outdoors that we're going to repeat it here.
How do you get a correct exposure of your skiing subject – or any other subject in bright snow under a bright sky – when the built-in meter in your camera is likely to underexpose because it reads the bright white of the snow and the bright glare of the sky? Result: All too often your subject comes out as a silhouette!
We gave five possible approaches to solve this problem starting, as always, with the three NYI Guidelines. The first Guideline asks the question, What's your subject? Your subject is the skier. (Or the skater or the sledder or the snowball-thrower or...anyone outdoors in the snow under a bright sky!) You want to expose for the skin-tones of your subject, not for the snow or the sky. How can you get the right skin-tone exposure under these very bright conditions? We offer five suggestions:
First, get next to your subject before the action begins, and take a closeup reading of his or her face using either your built-in meter or a separate meter. Use this exposure-setting when you later take the action shot.
Second, if you can't get close enough to take this close-up skintone reading, take a substitute reading on your own skin. If your skin tone is approximately the same as your subject's and in the same light, the exposure reading you get should be close enough.
 Third, take an incident reading with a separate light meter. The incident reading will read the light, not the subject matter. It should place the brightness of the snow, the sky, and the skin tones exactly where you want them, and give you a perfect exposure.
 Fourth, take a reading of a gray card with your built-in meter or a separate meter. The result should be the same as you would get with the incident reading. In other words, you should get a perfect exposure setting!
Fifth, use fill flash. We advise this especially when the face of your subject is coming toward you when you snap the shutter. The strobe adds light to the face despite the brightness of the snow and sky that the meter reads. On the other hand, realize the limitation of your flash unit. A small built-in strobe probably has a range of ten to fifteen feet. Don't expect it to light up the mountain.
So here are five possibilities for getting correct exposure on a skier – or any other subject in bright snow under a bright sky.
The one thing we don't advise is to rely on your built-in meter and just "meter the scene."
Let's move indoors to an arena. What about photographing hockey and other indoor arena sports? They offer a different set of challenges for a photographer.
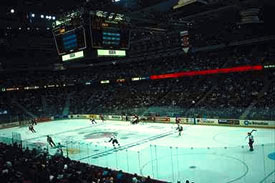 Let's get started by looking at some photographs taken by a hockey fan.
 This is the type of picture to avoid. Though a picture like this proves you attended the game, it really has little else to say. This is the problem if you try to take a picture from your seat way up in the nosebleed section of the bleachers using your SLR's normal lens or with a point-and-shoot. Our opinion: Don't waste your time.
What type of picture are you looking for? A strong closeup action shot like this is much better.
 How do you get such a picture? Well, of course you would like to get as close as you can to the action. But here's a problem. In any Big League games, you're not likely to be able to be offered a spot on the sidelines. Your best chance to get close to the action will be at high school and college games, not pro games. A day or two before a game, call the Public Relations Department of the home team or the local arena. Ask for permission to photograph from close up before the game begins. They may surprise you and say "Yes!" If the arena lets you in before the game, you may be able to get some great shots of your players or skaters, even if they're not in midst of competition!
 NYI Student Valerie Rothwell used to take photos of the Florida Panthers' hockey games from her season ticket seventh-row seat. But after using her NYI Photoworld press pass to persuade the Panthers' administration to give her credentials, she now shoots from the glass with the rest of the photojournalists to get great shots like the ones pictured below. Valerie's experience shooting in the arena has taught her a lot about photography, including the qualities of different films.
 "I've learned that Fuji works better than Kodak in this environment," she told us. "Kodak film seems to produce more of a blue-green type color in the images. It just made everything look a little dull. But with the Fuji, even through the glass, the colors are more vivid."
What do you do if you're stuck in the stands? Use a long lens like a 200mm or 400mm or longer. To hold it steady, use a monopod. But that's not all! If you're sitting in crowded stands, you may have a hard time getting the shot you want. That's because every time something happens that's worth photographing, the person in front of you is likely to jump up and block your lens. What to do? If possible, try to find a place in the stands where there's no one in the row or two in front of you. You may be able to get an unobstructed shot.
Even then you still may have a problem. You're pretty far back and your strobe won't reach far enough to illuminate the rink. What's more, at most arenas no strobe is permitted. No strobe! One reason for this rule is that strobe might blind the vision of the players.
Unfortunately a large number of arenas do not permit you to take pictures even without strobe. They have a simple rule: NO PHOTOGRAPHS PERMITTED. Period! If this is the case, you're completely out of luck. Put away your camera, and enjoy the game.
 However if cameras are permitted without strobe, you will have to shoot using the arena lights as your only lighting source. This means you should use fast film. Very fast film. ISO 800 or faster. And since you are most likely shooting action, you have to use a fast shutter speed.
 This is a tough combination. Think about it. If you're shooting from way up in the stands, will even your fast film be fast enough to stop the action in your long lens? Let's face it. Your 200mm or 400mm lens probably has a maximum aperture of Ÿ/4 or even slower. And you want to shoot at a minimum of 1/125th or 1/250th to stop the action. So even wide open, your long lens may not be able to get sufficient exposure. We highly recommend that you check with your light meter before the game to see if you should bother to take any pictures. If the lighting is not sufficient for high-speed shots with your long lens, don't waste your time or film.
Now that we've outlined the problems, let's not give up so fast. There are a few solutions.
As we already mentioned, you have a better chance to get close to the action in a high-school or college game and to set yourself up close to the action on the sidelines. Where should you position yourself?
 Hockey action occurs all over the rink, not just at the goal. In fact, if you position yourself behind the goal, you'll rarely get to see anything but the goalie's back. Our advice is to position yourself on the side, but toward one of the goals. From this position, you can get lots of action shots, like this photo here.
 Hockey has a problem you won't find in other arena sports – generally, a glass panel is between you and the action. How should you adjust for this? First, look carefully through your viewfinder to make sure you're not picking up much reflection. Since the arena is usually better illuminated than the stands, this may not be much of a problem. Second, however, if you are using autofocus, make sure your lens is focusing on the action and not on the glass. If it insists on focusing on the glass, turn it off and use manual focus. In this case, you are best off if you use a trick we describe in the NYI Course on Professional Photography, called "zone focusing" – that is, estimate your distance to most of the action you will be shooting, set your camera for this distance, and then don't adjust it when you shoot each picture. This works especially well if you are using a small aperture – f/8 or smaller – which will increase your depth of field.
 Don't forget to look for reaction shots too. Many a great picture of tragedy and triumph occurs after the event is over, like this one of the post-game celebration.
 Which brings us to figure skating.
In many ways, photographing figure skating is similar to photographing hockey because both sports are performed inside an arena on a rink. So, many of the tips we gave you for hockey pictures pertain to figure skating too.
But there's one big difference. While hockey pictures usually concentrate on the brutal aspects of the sport, figure skating pictures typically emphasize the grace and beauty. Having said this, however, we must admit that audiences (and judges) seem to be far more concerned with athletic prowess in the jumps than they are with the delicate balletic movements between jumps.
How can you best capture this athleticism as well as the beauty?
Where are you sitting? If you're ringside with your camera, that's one thing. If you're sitting back in the stands, that's another. Fortunately, sitting in the stands in a typical skating arena is not the same as sitting in the stands at a football stadium or Madison Square Garden. Usually, skating arenas are smaller and more intimate, with seating perhaps only ten rows deep. So being in the stands at most figure skating competitions or exhibitions is not as photographically challenging as being in the 50th row of a large football stadium.
 In addition, skating audiences are usually more polite than their counterparts at more aggressive sports, which means that, when the skater leaps and gyrates, the spectator in front of you is less likely to stand up and block your view and knock over your camera.
 Since photographing figure skating is often about catching the skater at the "decisive moment" (i.e., when he or she is at the height of a jump or other choreographed movement), we'd like to say something about the delay that most point-and-shoot cameras exhibit between the time you press the shutter button and the time the camera actually snaps the photo. This momentary delay occurs because the camera has to automatically set the focus, decide on the correct shutter speed and aperture to produce the right exposure, and determine whether you need a flash. While a second is not a long-time under most circumstances, it is far too long when you are trying to capture an action that takes place in a fraction of a second. Unfortunately, if you are using one of these cameras, you are likely to end up with a picture of a skater post-jump (or mid-fall) – assuming the skater is even still in your frame.
 The delay problem can occur with older automatic SLRs too if they are set to autofocus and autoexposure. Our advice then is that you use an SLR set to manual mode when shooting figure skating. And you should set your exposure and focus in advance so there won't be even a millisecond delay when the right moment comes.
 How best to set the focus and exposure, you wonder?
Pre-focus on an area of the rink. You won't be focused for the action that occurs farther away, but skating routines bring the performer to your side of the rink fairly predictably. You'll be prepared to shoot whenever the performer is in your pre-focused zone.
Whether you're photographing figure skating or any other indoor arena sport, when you set your exposure, remember that you are aiming for correct exposure of the performer or players in the glare of the lights, not for correct exposure of the ice or the court or the spectators in the stands. Even if your seat is not ringside, we recommend that you walk down there before the action begins and take a reading with your light meter. Perhaps you can get a reading of your own skin in the glare of the lights. Generally, the illumination is even across the entire rink.
 During the game, figure skating competition, or outdoors at a skiing venue, try panning some shots by following the movement of the athlete as you press the shutter-button. A good pan will produce a sharp image of the athlete against the blurred background of the spectators. When panning, use a slow shutter speed – like 1/15th, 1/8th, or 1/4th – and keep the athlete in your viewfinder as you press the shutter-button. A monopod or tripod is essential for good panning.
 If you follow the tips we've listed here and read the other articles we've called to your attention, you should be all set to get great images of all types of winter sports.
Shop at RITZ with confidence

Customers Loves RITZ
Outstanding ratings across
review sites.


Secure Shopping
Shop with confidence knowing that your data and information is safe. We absolutely do not share nor sell your information with anyone.

Multi Payment Option
Easily complete your purchase with the payment method that is the best for you.


Secure Shopping
NEWSLETTER SIGNUP
New Products. Promotions. photo Tips. special offers
